When I planned for Kingdom Arts and Sciences 2019, I decided that I’d keep to a theme. For (something akin to) sanity, I decided on working with items from Birka. The following is my documentation for small glass gaming pieces based on finds from that site.
Looking back over it, I definitely need to work on the flow of my writing, and there are some changes I’d want to make. (I swear, when I talk about it, I sound less like a middle-schooler writing a paper.) The project is one that I’m pleased with, but definitely there’s room for improvement. I’m putting serious thought into getting a period-ish furnace up in my backyard as it cools, and then seeing how different it is there.
Of course, I could also just buy new ceramic sheets and use my hothead…
Intro – Small Glass Gaming Pieces
Several set of glass gaming pieces were found at the 10th century Viking settlement of Birka. Lampwork glass has long been an interest of mine, and one that I’ve been pursuing for some time. As a part of that, I wanted to make a glass project that would have been appropriate for my preferred time period. While beads were the obvious choice, I kept coming back to the pieces that were found in grave 523. The colors were lovely, and they seemed to have a good shape and size. Not as intimidating as some other things.

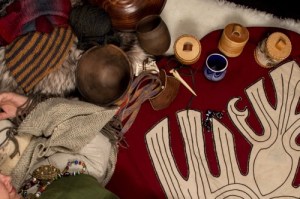
The gaming pieces from Birka
Giving credit where it is due, this project would not have been possible without the assistance of Bronwen Heilman, the flame shop director at Sonoran Glass and a talented artisst. This project took several months, and multiple attempts that created results best described as ‘blobby’. Her input, assistance and knowledge were vital in improving my technique and making progress on the project. Additionally, her suggestions helped to both improve the process and enabled me think of other ways that I work with the medium and achieve the final result that I was hoping for.
The Historical Evidence
My initial plan, after deciding to recreate the gaming pieces, was to use only items and information from the Birka archeological digs and research studies. That, unfortunately, turned out to not be possible. While the designs of the pieces are all based on items from Birka, local information on the actual construction is quite limited. A large percentage of the reconstructions I was able to find information rely on finds from other sites other than Birka of a roughly contemporary period – notably Haithabu. This is not entirely surprising, as Birka was a trading center and items from a considerable distance away passed through the settlement. My focus for this project was the process by which the items were created, not the location they were made. While this merits further research, it’s not a central element of my current work.
The game pieces are all determined to be for hnefatafl, which is a game played with two sides of unequal numbers. The smaller force guards a king, who is a separate, distinct piece. All rule variations appear to have originated from an 18th century description of a similar game played amongst the Sámi people.
Initial Thoughts
I was not able to find any evidence of glassmaking within the bounds of the Birka settlement. However, such evidence can be found in other Viking-era sites. There is strong evidence for the existence of Norse glassmakers. If there were any at Birka, however, there is no archeological record of them.
Initially, I thought that it would be difficult to find evidence of even pieces, but I was pleasantly surprised to find otherwise. In fact, the biggest issue was technical, not research-oriented. I had to determine the best way to mount the glass on the end of the mandrel (a thin metal rod used to manipulate and shape the molten glass) and keep it steadily there without moving or sliding down the mandrel, or the metal rod on which the game piece is formed.
Making Game Pieces in Period
While the pieces were found in Birka, information for actual creation of the pieces can be at Ribe, Denmark. At the site there, the glass-makers used a furnace. My Laurel and I experimented with this method, both in making a furnace and in attempting to create beads with it. The experiment, while fascinating, was not strictly successful. However, it was useful in that it gave me an idea of some of the logistical problems that accompany this setup, as well as a look at the actual historical process.
As most of my sources are two-dimensional, both photos and drawings, and I didn’t have physical pieces to examine, I had to make several educated guesses. The artifact listings for the game pieces only note the king as being about 40mm, but not the size of the others. Based on estimations, I thought about 30mm would be the appropriate size. Isuspected that the glass was either gathered onto the edge of a mandrel and then heat applied until the glass rounded. The amount of glass collected would determine the size – due to the nature of the medium, it’s hard to get a piece smaller if you make a mistake with making them too large. The dark lines are stringers, or pieces of glass drawn out to a more narrow diameter, that can then be laid down to form the shape.
Materials

They really do look weird when you start.
Glass beads – and by extension game pieces – are incredibly simple. The material is gathered onto the end of a rod, shaped using heat (glass, like soap bubbles and water drops, likes to be round) then allowed to cool down slowly and in a controlled manner.
Most notably for me, in period, the mandrels used were conical (an interesting fact as the images you can see of the extant ones appear to have a straight hole), which allowed for
the bead to more easily slide off when cooled.
My Creation
To make this project, I went to Sonoran Glass School and used their workshop. This gave

I miss this setup so much…
me access to an oxygen-propane flame, plus the use of their kilns for annealing/cooling the final results, without having to spend the requisite thousands of dollars to purchase all the necessary tools myself. It also meant that I have more ability to play with the temperature, and see what works better. (And, much like with power tools, get hurt a lot
faster and with much hotter glass. I’ve become pretty used to things shattering here and there, and have some fun burns to show off.)
Much like the Viking finds, these pieces were all formed on mandrels. In period, the mandrels would have been conical, so that as both metal and glass cooled, they separated. Modern glassworkers use uniformly sized mandrels and the metal rods are dipped in a clay mixture to ensure that the glass doesn’t stick to the metal. To get free the glass pieces from the mandrels, I simply soaked the mandrels in water and then pulled the bead off. When necessary, I used a small file/bead reamer to clean out the center of the bead.
The extant pieces do not use the same color scheme that exist in the extant finds. Instead, I chose to create a set drawing inspiration from other existing beads. Specifically, the side with the king come from a white and blue bead in grave 515, and the other side comes from grave 946.
The glass itself is all commercially produced and obtained from Frantz Art Glass. I used a mixture of their house effetre and the brand Creation is Messy. (All is 104 COE. COE being Coefficient of Expansion, which describes how much glass will expand and contract when heat is applied. Mixing COEs will mean that you run a higher risk of your work breaking at some point during their lifespan.) My initial thought was that I would form the pieces like a bead, only at the very end. The problem with this quickly became clear – the end of the mandrel was always far closer than I wanted. While some of the game pieces appear to have the hole very close to the end, I ran the risk of an unsightly bulge at the top. One night, Bronwen suggested that I form a small round piece at the top of the mandrel and then build upwards. While it worked, the holes that I could see appeared to be the entire length of the bead. So I ended up starting pieces that way, and then building the game piece downwards.
The small, thin, lines are stringers that I made by heating both a scrap of glass and the

Stringers… thin lines of patience and steady hands. I often have one, but not the other.
end of a mandrel until they were red-hot. I then pushed the glass and mandrel together and allowed them to cool slightly. This ensured that when I pulled the two ends apart, they did not separate. When secure, I pulled both sides apart, stretching them like taffy until a stringer formed. The speed used when pulling and the size of the mandrel used dictates how thick the stringer is. In the final version, however, I decided that I wanted to use commercially made stringers, in order to have more uniformity.
I tried heating the stringers before adding them to the piece, but they almost always melted back up into balls and failed to create the result I wanted. Eventually, I determined that I needed to heat the bead so that when I laid the stringer down, it would melt into the glass. Then, the whole bead was heated to ensure a smooth exterior.
The creation process for the king was much the same. However, I worked the glass so it both ran down the mandrel and added more along the bottom of the piece. Additionally, I rolled the glass on an angle to create a cone shape. To form the head, I then cooled the piece some, added a small amount of glass to the top and heated it.
(While not in the documentation, I should note here that the king was based on the one found in grave 750. He looks like a tiny alien and I love him.)
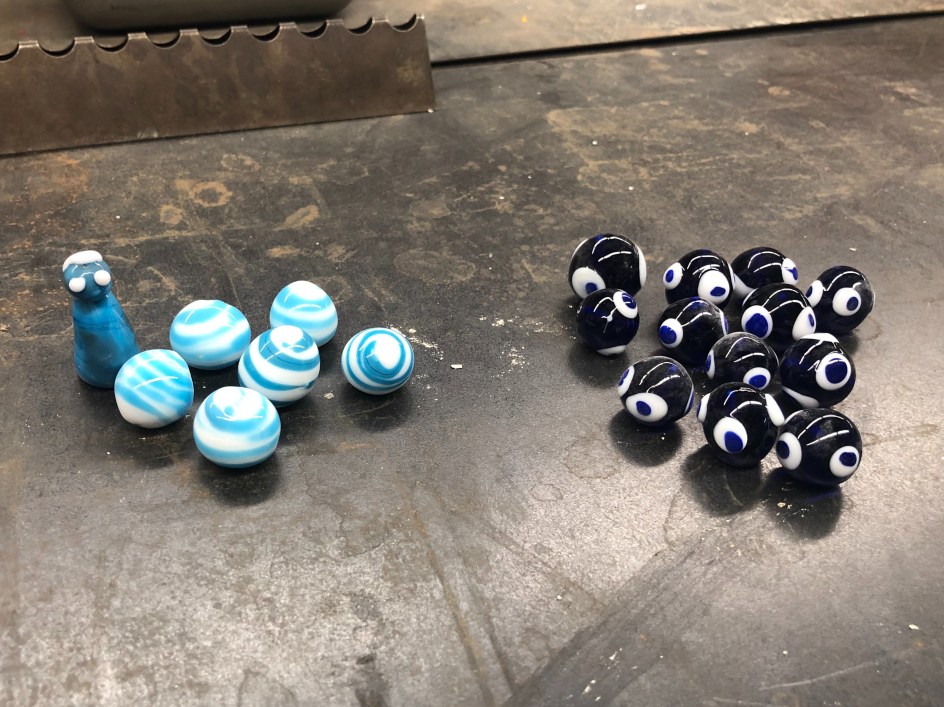
The final set.
Issues and Thoughts
I have not yet been able to get an official answer from the Swedish National Museum regarding the exact size of the game pieces themselves. This has ended up being one of the largest issues that I’ve struggled with and is one of the constant frustrations that I had when I worked on this. Eventually, I decided to focus on making everything consistent, so long as I had a larger king piece. This ended up helping significantly as it allowed me to focus on uniformity, which was something that continued to haunt my work. When making some of the pieces, I struggled to maintain the optimal balance of oxygen and propane, inadvertently causing discoloration in some pieces – a result I wouldn’t have minded had I not been attempting to recreate a specific color and piece.
In the future, I want to try a few other methods of creation – specifically using a kiln and furnace, and gathering glass as if it were being used for glassblowing. Currently, I do not have access to such a setup and it is prohibitively expensive for me to purchase the supplies and and get it made. However, there is a possibility that in the early fall, I will be able to do this at Sonoran Glass School.
Conclusion
I’ve had a blast here. Eventually, my goal is to make a full set that is equally sized, but for now I feel as if I’ve got the basics down and they’re closer to what I want for the full set. It’s helped me to work on my glass control, as well as small and useful aspects such as making stringers.
Bibliography
- Cummings, Keith. A History of Glassforming. A. & C Black, 2002.
- Küçükerman Önder, and Maggie Quigley Pinar. Glass Beads: Anatolian Glass Bead Making: the Final Traces of Three Millennia of Glass Making in the Mediterranean Region. Turkish Touring and Automobile Association, 1988.*
- Mentasti, Rosa Barovier, and Cunéaz Giuliana. Glass throughout Time: History and Technique of Glassmaking from the Ancient World to the Present. Skira, 2003.
- “Statens Historiska Museum.” Startsida, The Swedish History Museum, http://mis.historiska.se/mis/sok/birka.asp?sm=10_7.
- Whitehouse, David B., et al. Medieval Glass for Popes, Princes, and Peasants. Corning Museum of Glass, 2010.

One thought on “Birka Gaming Pieces”